[Gophish] Sophisticated Setup
Summary
So in this blog post I want to show how you can setup Gophish together with Caddy and Maddy to work as a multi domain phishing setup. DISCLAIMER: This tutorial is only for educational purpose and should not be misused to actually carry out legit phishing attacks without consent.
That said, we will have to talk about the components used and the prerequirements for this to work.
Components and requirements
- Caddy: This is an open source web server and reverse proxy written in go
- Maddy: This is an open source mail server written in go
- Gophish: This is an open source phishing framework written in go
Caddy
The Caddy server will function as an easy to use reverse proxy and also will handle the creation and distribution of the https certificates in use.
Maddy
Maddy will be configured as an open mail relay for the phishing framework to be able to send emails to the targets.
Gophish
Gophish will be the heart of this eco system. It will be used to create email and landing page templates to be served to targets via a crafted phishing campaign.
General Requirements
You will need a server you have control of and which is reachable from within the internet. For this purpose I use a simple root server setup at a hosting location. Also you will want to register several domains under your control for this to work.
General setup
For getting a better overview I will show you the folder structure I created:
❯ tree -L 1
.
├── caddy
├── Gophish
├── maddy
└── webhook
Although you technically could install caddy as well as maddy system wide I chost to start it from command line on demand. See it as your homework to find out how to setup a permanent setup on your system. The documentation of the components will tell you how to use systemd for example.
Also I will explain the webhook one later on.
Setup and run Gophish
I chost to fetch Gophish from github by cloning it to the Gophish folder like so:
git clone https://github.com/Gophish/Gophish.git .
Afterwards you will just need to build it by running: go build and you are almost done.
Open up the config.json and change the phish_server’s listen_url to listen on port 8080. This is 80 by default. As caddy is running as reverse proxy later on and is wanting to run on port 80 we need to change that here.
Now you can run Gophish like so:
❯ ./Gophish
[.. output ommited ..]
time="2021-03-10T13:38:36+01:00" level=info msg="Please login with the username admin and the password 4865c199b9df1250"
time="2021-03-10T13:38:36+01:00" level=info msg="Starting IMAP monitor manager"
time="2021-03-10T13:38:36+01:00" level=info msg="Starting phishing server at http://0.0.0.0:8080"
time="2021-03-10T13:38:36+01:00" level=info msg="Creating new self-signed certificates for administration interface"
time="2021-03-10T13:38:36+01:00" level=info msg="Background Worker Started Successfully - Waiting for Campaigns"
time="2021-03-10T13:38:36+01:00" level=info msg="Starting new IMAP monitor for user admin"
time="2021-03-10T13:38:36+01:00" level=info msg="TLS Certificate Generation complete"
time="2021-03-10T13:38:36+01:00" level=info msg="Starting admin server at https://127.0.0.1:3333"
You can see the initial password from the commandline output. Next up you need to connect to the local bound port 3333 of your Gophish instance to be able to interact with it. I did that by forwarding the port via my ssh session like so:
ssh -L 3333:localhost:3333 -l patrick <ip-root-server>
Afterwards you can direct your browser to https://localhost:3333 and configure Gophish. But first we will continue by getting caddy and maddy up and running.
Setup and run Caddy
So all you need is the caddy executable. You will get it here (as the time of writing).
Now to make caddy work you will need a Caddyfile (aka config). This is quite easy. It’s content could be this for example:
henerthebox.de {
  handle /* {
    reverse_proxy localhost:8080
  }
}

ipwnyour.network {
  handle /* {
    reverse_proxy localhost:8080
  }
}

hesec.de {
  handle /webhook {
    reverse_proxy localhost:9999
  }

  handle /* {
    reverse_proxy localhost:8080
  }
}
So let me explain real quick what I did there. The domain henerthebox.de and ipwnyour.network are under my control and are supposed to mimic a domain a phishing target would fall for. So if you would need to carry out a phishing attack for a customer called Nice View Incorporated for example and they have a domain named niceview.com you might wanna register a domain named nicview.com and carry out the attack using it here in your Caddyfile.
The domain hesec.de is also under my control obviously and will be used to handle the webhook I promised to elaborate on later and also be the endpoint where Gophish is serving the phishing content. We will see how that works in a second.
You are now ready to run that caddy server like:
sudo ./caddy run --environ --config ./Caddyfile
Setup and run Maddy
So maddy will function as our open mail relay server. For this purpose I just downloaded and extracted the tarball from here. I chost the newest version available.
To make maddy work you will need a configuration file. I needed to alter the maddy.conf which was within the tarball as an example.
In the top of the configuration I added my domain hesec.de to be the primary domain like so:
# ----------------------------------------------------------------------------
# Base variables

$(hostname) = hesec.de
$(primary_domain) = hesec.de
$(local_domains) = $(primary_domain)

tls file /etc/maddy/certs/$(hostname)/fullchain.pem /etc/maddy/certs/$(hostname)/privkey.pem

# ----------------------------------------------------------------------------
Find the lines which look like these:
submission tls://0.0.0.0:465 tcp://0.0.0.0:587 {
    [-- ommited --]

    auth &local_authdb

    source $(local_domains) {
        destination postmaster $(local_domains) {
            deliver_to &local_routing
        }
        default_destination {
            modify {
                dkim $(primary_domain) $(local_domains) default
            }
            deliver_to &remote_queue
        }
    }
    default_source {
        deliver_to &remote_queue
        # reject 501 5.1.8 "Non-local sender domain"
    }
}
See how there is a # in front of one line? That has not been there from the beginning. I commented this line and added the line deliver_to &remote_queue to be able to send as every email address I would like. This enables Gophish to spoof the sender address correctly.
So finally you will need a valid account to send with. I chost to create one like this:
❯ sudo ./maddyctl -config ./maddy.conf creds create webmail@hesec.de
< You will be asked for a password here. Take note of it as you will need it later.>
❯ sudo ./maddyctl -config ./maddy.conf imap-acct create webmail@hesec.de
Finally you will need to provide certificates to maddy as it otherwise will not run correctly. I just happend to have some layin around. So I linked them to the path in the configuration file:
tls file /etc/maddy/certs/$(hostname)/fullchain.pem /etc/maddy/certs/$(hostname)/privkey.pem

❯ ll /etc/maddy/certs
Permissions Size User Date Modified Name
lrwxrwxrwx@   32 root  9 Mar 16:22  hesec.de -> /etc/letsencrypt/live/hesec.de
But you can also just create self-signed ones. This depends on you.
Next up we run maddy like so:
sudo ./maddy -config ./maddy.conf
Now we are good to go. We can start creating our first phishing campaign.
Setup a campaign
So I consider you already changed your admins password within the Gophish ui and now you can start adding data.
Sender Profile
So first of all I am adding a so called Sender Profile. I will do this for every customer/campaign I deploy. So take the example of ipwnyour.network.
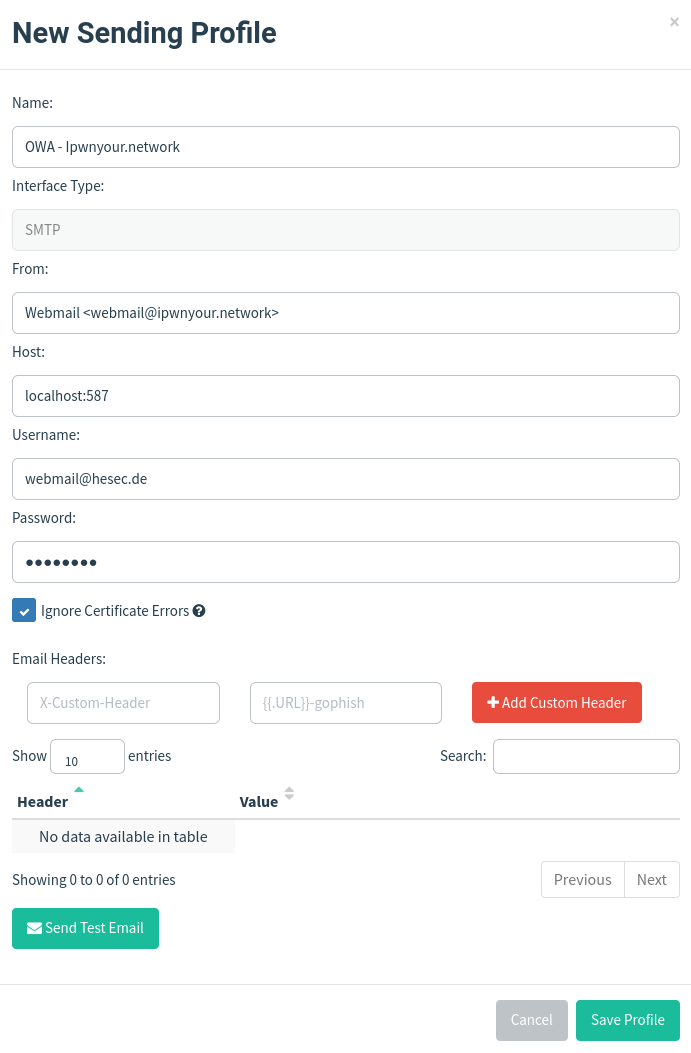
As you can see I give a recognisable name like OWA - domain which will indicate I will use a Outlook Web Access scenario for this example. Then you see in the From: field that I am using a mail address which isn’t real. This one is spoofed later on. The Host: field points to the maddy local port for sending mails. Username: and Password: are the ones you created above when setting up maddy.
Be sure to tick Ignore Certificate Errors as we did or did not provide a valid certificate with maddy. But we do not care anyway.
Now you could test if your maddy server is capable of sending a mail with this configuration by using the Send Test Email button. I did and it was capable of sending an email.
Email templates
You will need to provide an Email template to be sent by Gophish when carrying out the attack. In my example scenarion the company has a new webmail access which needs to be tested by our target.
I will not go into much detail here, as you can be creative all you want in here. Just a general notice. If you have an outgoing link, as I suppose you will want to have one, you will need the href to point to {{.URL}}, so that the link will point to the Gophish server later on. If you are not sure what to put here, read the excellent documentation of Gophish here.
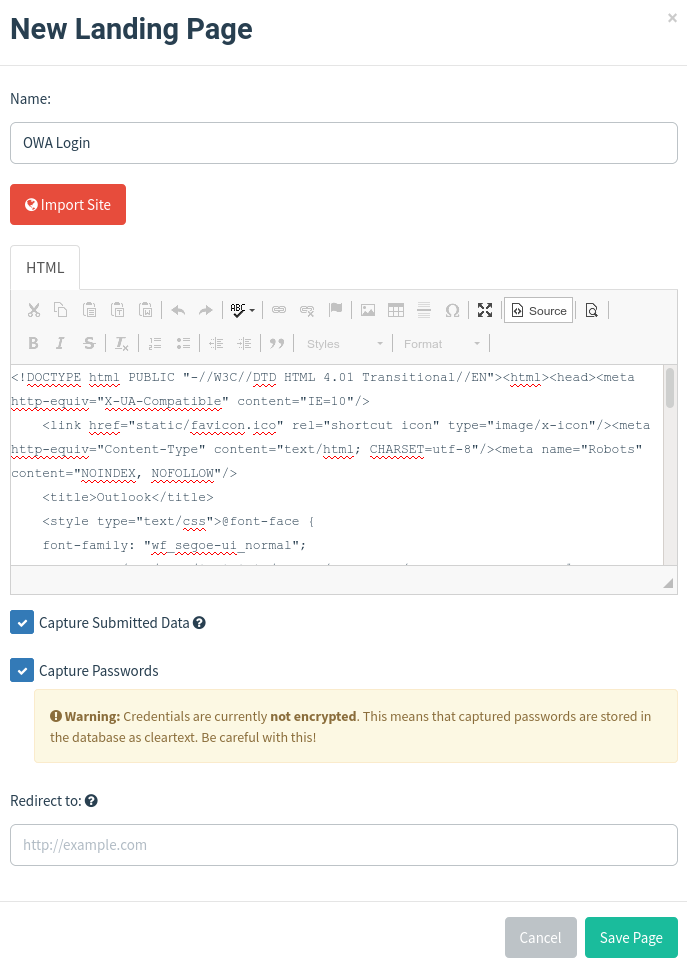
Landing Page
The same as for Email templates applies to the landing page. The landing page will be the one displayed to your target when clicking on that link in the Email the target received.
In your landing page html markup you will need to make sure you include some markup like this if you want to capture credentials:
<form action="" autocomplete="off" method="POST" id="submit-form" name="logonForm">
<input aria-labelledby="userNameLabel" id="login" name="login" role="textbox"/>

<input aria-labelledby="passwordLabel" id="password" name="password" type="password" value=""/>
</form>
This is a simplified version take out of my actual template. Then you can decide to capture submitted data and the provided password if you like or you can just track if someone was clicking on the link to begin with. For this tutorial I will illustrate the attack with a fully featured credential capture.
User Groups
Finally you will have to add a user group. Just to test it out I used my own private Email address and added it in here:
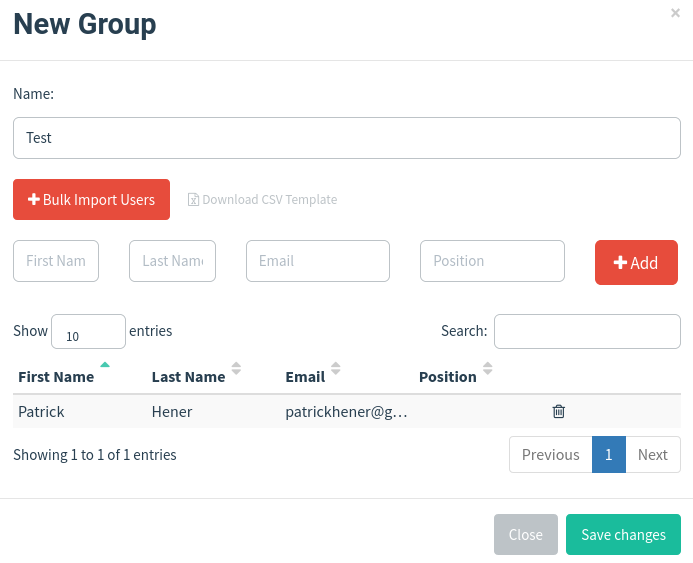
You can bulk import a csv file here for example to speed up a deployment.
Start the campaign
Starting a campaing is now only a matter of choosing together the assets and hit start:
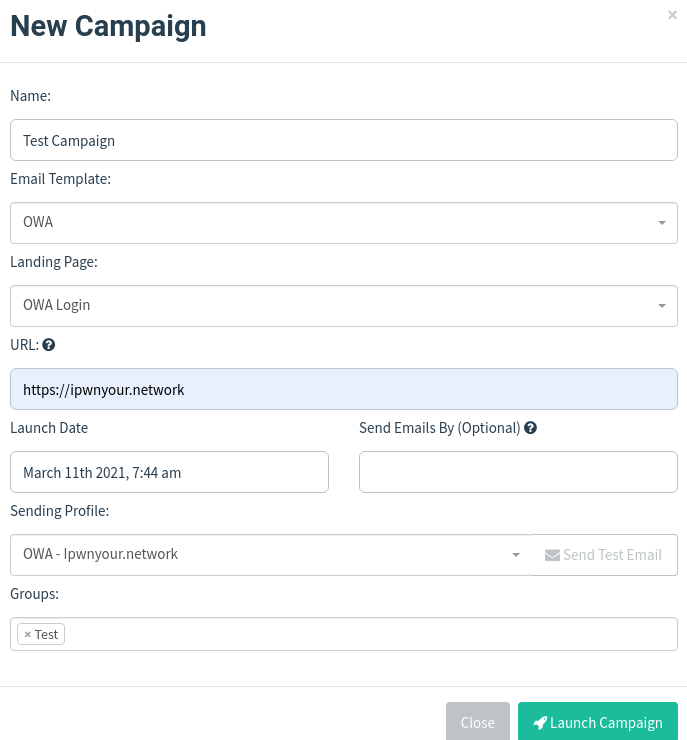
The field URL: is pointing to the one domain you have registered for the attack. In my example this was ipwnyour.network.
Hit Launch Campaign and see the magic happen.
Campaign Analysis
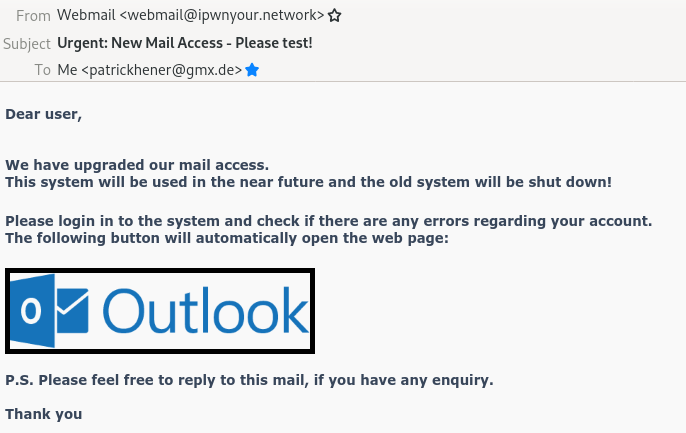
So after hitting launch I got the Email as expected:
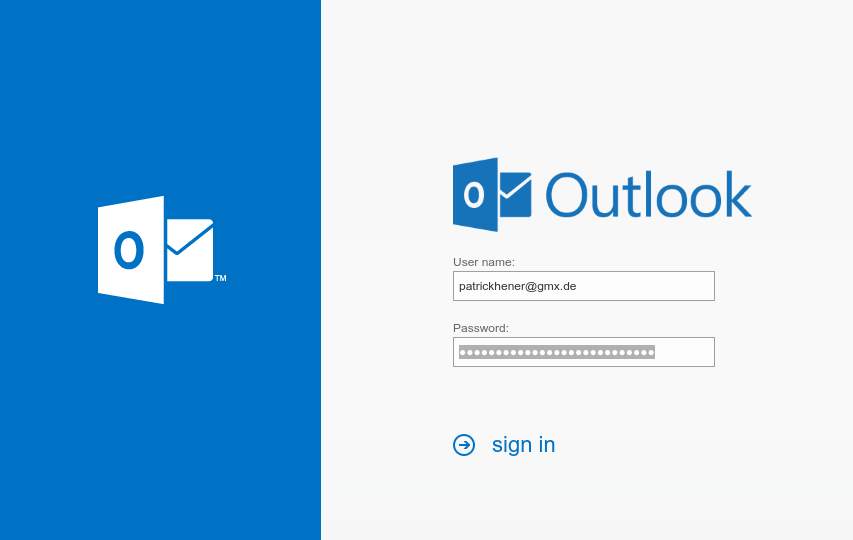
Next up when clicking the image you will land on the landing page looking like this:
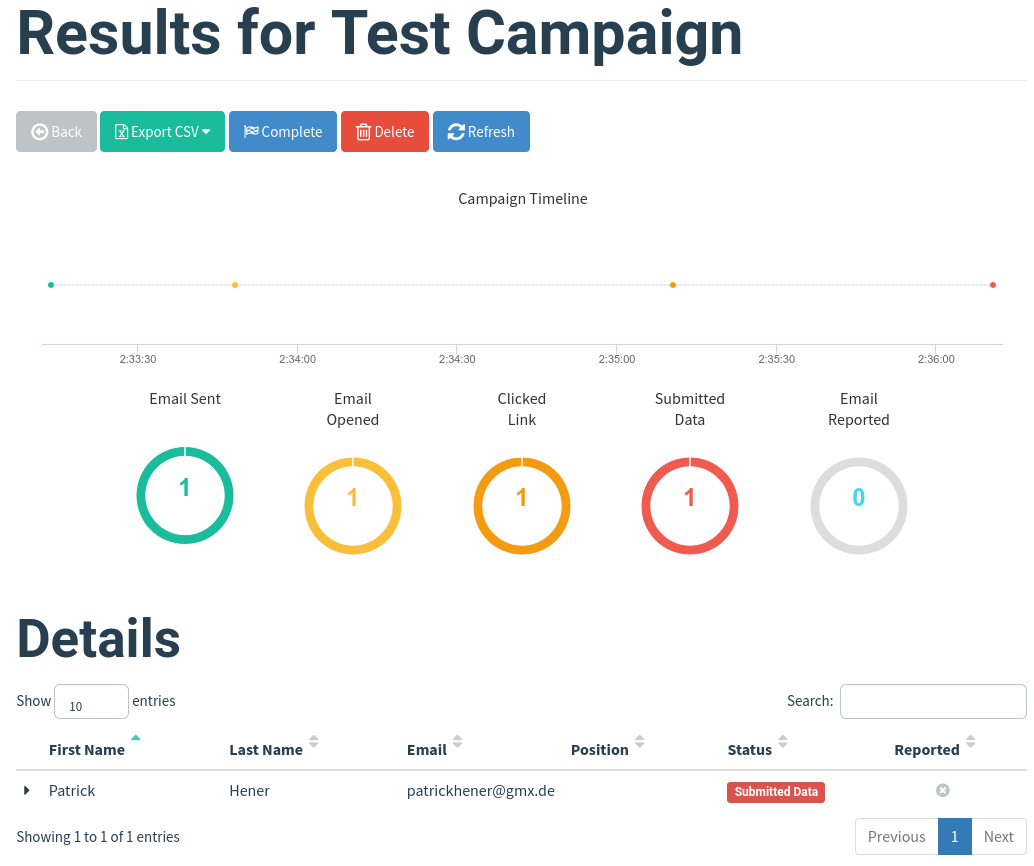
Campaign statistics in the Gophish ui will now look like this:
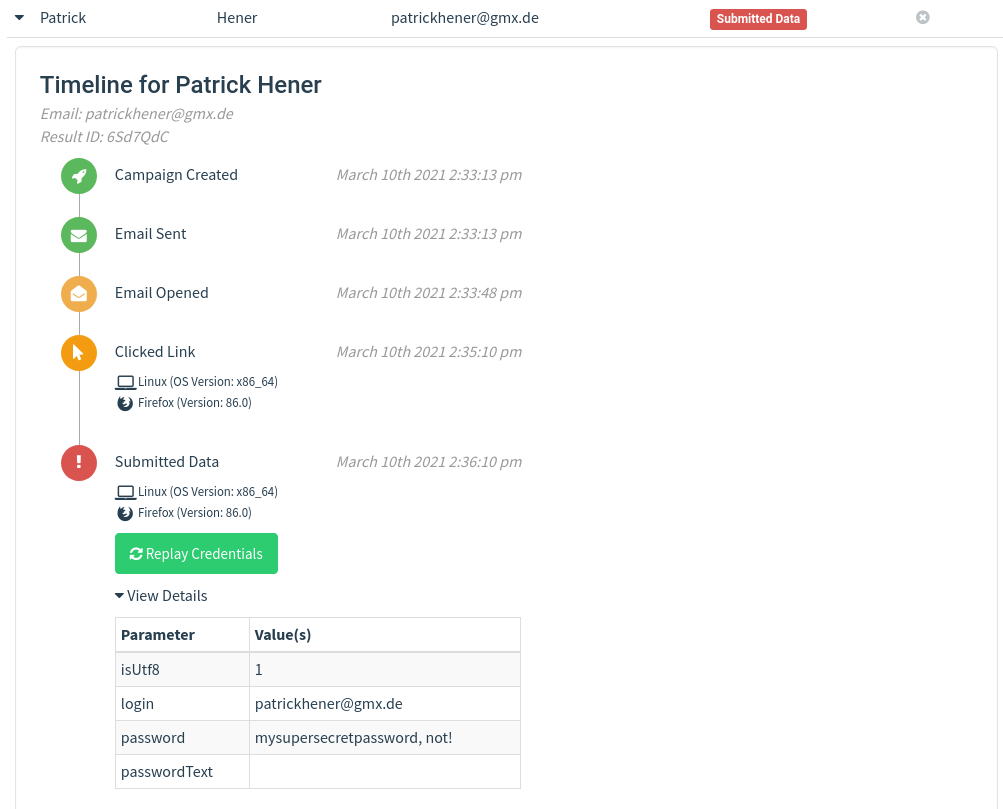
And the recorded credentials are shown here:
Bonus: Webhooks
So in an engagement where time matters (Red Team anyone?) you can use webhooks to be notified if someone acts on your phishing campaign. I used the webhook repo of the Gophish github to demonstrate. But one could image you filter on events like inputting credentials and then submitting an Email alert or such.
Remember the webhook directory from the beginning and the caddy endpoint using /webhook? This is what this is for.
After cloning you start the webhook like so:
git clone https://github.com/Gophish/webhook.git .
[ommited]
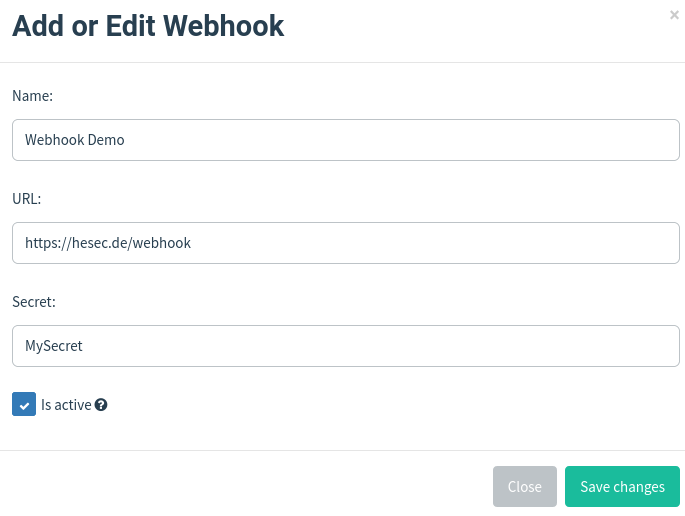
❯ go run ./main.go -u "/webhook" -p 9999 -h 127.0.0.1 -s MySecret
INFO[0000] Webhook server started at 127.0.0.1:9999/webhook
Now you configure Gophish to use this webhook like so:
And there you go. Everytime something happens with your campaigns the webhook server will act on it. In this example it will just log what was happening like so (clicked and entered credentials):
POST /webhook HTTP/1.1
Host: hesec.de
Accept-Encoding: gzip
Content-Length: 295
Content-Type: application/json
User-Agent: Go-http-client/1.1
X-Forwarded-For: 2a07:2f00:1337:10:250:56ff:febd:4f2
X-Forwarded-Proto: https
X-Gophish-Signature: sha256=0830e14a61d26b75c733ceffa3d360dc6918edc6c56b6b7f68ef60e2ba1159d4
{
    "campaign_id": 3,
    "email": "patrickhener@gmx.de",
    "time": "2021-03-10T13:46:14.314760124Z",
    "message": "Clicked Link",
    "details": "{\"payload\":{\"rid\":[\"6Sd7QdC\"]},\"browser\":{\"address\":\"80.140.147.123\",\"user-agent\":\"Mozilla/5.0 (X11; Linux x86_64; rv:86.0) Gecko/20100101 Firefox/86.0\"}}"
}
POST /webhook HTTP/1.1
Host: hesec.de
Accept-Encoding: gzip
Content-Length: 400
Content-Type: application/json
User-Agent: Go-http-client/1.1
X-Forwarded-For: 2a07:2f00:1337:10:250:56ff:febd:4f2
X-Forwarded-Proto: https
X-Gophish-Signature: sha256=86988d83cc6cf9a7b59ce920414b3489e78e5af48c5748f2765e0dbba2589a53
{
    "campaign_id": 3,
    "email": "patrickhener@gmx.de",
    "time": "2021-03-10T13:46:22.044021875Z",
    "message": "Submitted Data",
    "details": "{\"payload\":{\"isUtf8\":[\"1\"],\"login\":[\"patrickhener@gmx.de\"],\"password\":[\"lolz\"],\"passwordText\":[\"\"],\"rid\":[\"6Sd7QdC\"]},\"browser\":{\"address\":\"80.140.147.123\",\"user-agent\":\"Mozilla/5.0 (X11; Linux x86_64; rv:86.0) Gecko/20100101 Firefox/86.0\"}}"
As you can see it immediately logged every action on the campaign including the credentials provided.
Homework / Open TODOs
To spice up this setup a little bit the following things could be done after the initial setup
- Run caddy and maddy as a service
- Run caddy in API mode to be able to quickly add target domains and reload the service
- Write API Client to add target domain in caddy and deploy a campaign in Gophish in just one click
- Write Email alert webhook client
Final Words
So there you have it. Complex and sophisticated phishing framework setup, made easy. I hope you liked the insights of a pentesters daily business. Stay safe and healthy. See ya around.